Making Videos
Making WoW videos (sometimes called machinima, which is a more generic term for videos made using computer games) is a lot of fun though it can be time consuming. As long as you're having fun though, that's not a problem, is it?Below is a comparison of the two main ways to make WoW videos, followed by tips, YouTube tutorials, and other info that you may find useful when making your videos.
If you're thinking about making your own WoW videos and have questions, feel free to contact me. I'm not an expert but I may be able to help. If you've got other specific questions, let me know.
Want To Make WoW Videos? Here's How
The Easy(er) Way -- Capture all your footage in-gamePros:
|
The Hard(er) Way -- Using the Model Viewer for most of your shotsPros:
|
My Set-up
Here is the hardware and software I'm currently using to make my videos. It's not perfect, but it gets the job done.- On my Mac:
- Mac OS 10.6.4 (Snow Leopard). For the longest time, I delayed upgrading for fear that it would screw up the programs I needed to make videos. When WotLK came out, most of the programs got screwed up anyways, so I decided to switch to Leopard after all, and it's worked out just fine.
- Parallels 6.0. I use Parallels so that I can run PC programs on my Mac. That way I can use all my Mac programs (which I prefer) for video editing but still use the PC versions of the Model Viewer.
- World of Warcraft. I've got WoW installed in the PC partition as well as on my Mac proper. I play the game with the Mac version and can use it to get background shots. I never actually play with the version I have installed on my PC partition -- it's only there so that the WoW files will be accessible by the PC version of the Model Viewer.
- Snapz Pro X 2.1 is the screen capture program I use. It's very easy to use and I like it a lot. It's Mac-only, so what I do is start up Parallels, open the Model Viewer app (for example), get the model doing what I want, then use Snapz Pro X to capture the animation that's going on in the Parallels window. It saves the .mov file to my Mac's desktop where I can use it immediately in After Effects.
- After Effects CS4. Great program.
- Photoshop CS4. Great, great program.
- iMovie 6.0.3. This is not the latest version of iMovie. I never upgraded because I'm comfortable with this one and because I've heard that the latest version is better for quick editing of home videos than it is for the kind of thing I do. I don't use iMovie to make the final version of my videos anymore because the resulting quality is so bad. I use it to quickly slap together my clips so I can work out the timing of the whole thing. When I'm happy with it, I switch to Premiere Pro to make the final version.
- Premiere Pro CS4. Yes, the fact that I use iMovie to put together my video once then have to put it together again in Premiere Pro does mean that I'm doing the work twice. But I've found that while Premiere Pro does output videos in much higher quality than iMovie, Premiere Pro just isn't simple enough for me to use it as my slap-stuff-together-to-see-how-it-looks application. Besides, after weeks of working on a video, the extra hour or so I spend re-laying it out in Premiere Pro (remember, I already know exactly how the clips fit together and how long each should be) is really a drop in the bucket.
- WoW Model Viewer. There is apparently a Mac version of the Model Viewer now, but it doesn't work for me. The 3D models don't display correctly. Don't know if that's my fault, or the program's fault.
- WoW Map Viewer. It's broken for the Mac and shows no signs that
it will ever be fixed.
- On the PC in Parallels:
- World of Warcraft. As mentioned above, I have WoW installed in both my Mac and PC areas on the computer, and the PC version is only there so that WoW's files will be accessible by the Model Viewer.
- WoW Model Viewer 5.09. WotLK broke the original Model Viewer, but I sort of figured out a way around it. Here's what I ended up doing -- before I upgraded the version of WoW I have in my PC partition to WotLK, I copied all the files to a different folder. Then I pointed the Model Viewer to those copied files instead of the actual WoW files that I eventually upgraded to WotLK. The Model Viewer still works like it always did, although it can only show pre-WotLK stuff.
- WoW Model Viewer 0.6.0.3. I also use this version of the Model Viewer to get shots of elements from WotLK that version 5.09 won't show. Yes, I could just use one version, but 5.09 has worked fine for a long time so I'm still using that the most.
- WoW Map Viewer . There seems to be a new Map Viewer out there (see link above), though it barely works for me. I'm trying to run it in Parallels on a Mac, so maybe
that's more than it can handle.
- Keeping things organized:
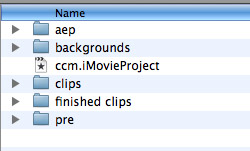 The first thing I do whenever I start a new video is create folders to keep everything organized. I create the following folders:
- "aep". This is where I save all my After Effects files (which end with .aep)
- "backgrounds". This is where I save the background images or movies for each scene.
- "clips". This is where I store each individual element I put into the scenes, things like the characters, objects, etc.
- "finished clips". This is where I store the finished video of each scene when I decide I'm happy with it.
- "pre". This is where I store all the files that Premiere Pro creates when I make my final video.
- I make sure to name each file according to a system to make it easy to find and use them later. A typical video of mine will have 50 or more shots, each with quite a few
images and video clips that go into it, and if I didn't have a naming system, I'd never be able to find anything:
- Each shot is numbered sequentially using two digits. So the first shot is "01", the second is "02", etc.
- All elements associated with each shot have their filenames begin with the shot number. That means that the background for the first shot will be called "01_bkg.mov", a character in the first shot could be named (for example) "01_elf.mov", an object in the first shot could be named "01_table.psd", etc.
- This system makes it easy to keep multiple shots of the same element separate. For example, in "Code Monkey", I had tons of shots of the ape. By naming them "01_ape.mov", "02_ape.mov", etc., I can always quickly find which shot of the ape was used in which scene in the video.
- Keep filenames short. Most of the time, I'll just name the main characters in a video "him" and "her" so that their clips for the first shot were called "01_him.mov" and "01_her.mov". As long as I know who they refer to, and I use the same name each time, there's no need to call a file "01_skullcrusher_scientist.mov" if I can avoid the extra typing.
- Sometimes you'll have multiple clips of the same element in a shot. In that case, just add a short descriptor to the filename so you can tell them apart, maybe something like this: "01_him_standing.mov" and "01_him_dancing.mov".
- When the video is done, I used to just delete all the source files, figuring I'd never need them again. Big mistake. I wish I'd kept the source files for all my earlier videos so I could redo them at higher quality, or reuse them whenever the need arises. What I do now, is I've bought an external hard drive and when I'm done with a video I move all the source files onto the drive for long-term storage. Video files are large, and you'll have a lot of them, so be sure to get a big hard drive, which is thankfully pretty cheap nowadays.
Video Tutorials
These are tutorials I've found around the Interwebs (or which have been pointed out to me by someone) that I thought were helpful in learning a particular technique, or even in showing me a technique I didn't know was possible. The best place to start with these is with Oxhorn's tutorials. They cover the basics you need to know, and had plenty of tips I hadn't known before I watched them.
| Video | By | Notes |
|---|---|---|
| Oxhorn's Great Tutorials | ||
| Overview | Oxhorn | A general overview of the tools you'll need to make your videos (mostly PC info, but important to know for everyone). |
| Screen Captures | Oxhorn | The basics of using Fraps and WeGame screen capture programs. |
| In-game mods | Oxhorn | The basics of getting in-game WoW shots using some recommended game mods. |
|
Model Viewer - Pt. 1
Model Viewer - Pt. 2 |
Oxhorn | An overview of all the options available in the WoW Model Viewer, and how to use them. |
|
Map Viewer - Pt. 1
Map Viewer - Pt. 2 |
Oxhorn | An overview of how to use the WoW Map Viewer. |
|
Motion in AE - Pt. 1
Motion in AE - Pt. 2 |
Oxhorn | A bit more confusing than his other tutorials, this one shows you how to make characters move around the stage in After Effects. Stick with it, because there's good info there. |
|
Color Keying - Pt. 1
Color Keying - Pt. 2 |
Oxhorn | I include Oxhorn's keying tutorial for completeness sake and because there are bits of good info on using AE in them (stuff about masks, opacity, etc.), but I use a different method to key out background colors than he does, and I think it's better. You'll find a walkthrough of my AE keying method elsewhere on this page. |
|
Shadows - Pt. 1
Shadows - Pt. 2 |
Oxhorn | Part One shows you how to make the disc-shaped shadows that the characters have in WoW. Part Two shows you how to make shadows that look like they're actually cast by the characters. |
| Color Correction | Oxhorn | Great tips on changing colors to make foreground and background elements look more natural together. |
| Rendering in AE | Oxhorn | Shows you how to render your video in After Effects, turning all your individual elements and special effects into a video clip you can use in Premiere. |
| Rendering in Premiere | Oxhorn | Shows you how to render your final video in Premiere, turning all your individual clips and audio into the final video you'll post on the Web. |
| After Effects | ||
| 3D Text | TrackEditor99 | Extrude your text to make it look 3D. |
| Basic Fire | ChadandtoddPodcast | Shows how to make a screen full of animated fire. The techniques used to make the fire could also be used to make fog or smoke. |
| Image/Movie inside text | TrackEditor99 | This trick puts an image or a video clip inside some text, which you can then animate to move across the screen or do whatever you want. |
| Fireworks | TrackEditor99 | Make basic fireworks explosions in After Effects. |
| Kamehameha Energy Blast | Damonstration | Shows you how to make an energy blast special effect like the Kamehameha blast in Street Fighter. The video is long (17 min) but moves at a good pace. It's not for AE beginners, but it's definitely not too complex for anyone who's spent a little bit of time using the program. |
| Motion Tracking | vfxpro | I wish I'd used this on a couple of my videos to make things easier. I did it all by hand. :( |
| Screen Shake | iTziAero | Make the screen shake like when a giant is walking by or a big explosion has just gone off. |
| Shine Effect | evansdigital | This effect makes it look like someone is shining a light from behind your text (or whatever) out at the viewer. It's a cool effect, one that we've all seen in movie titles for years. Apparently there's an AE plug-in out there that you can buy that will let you do this, but this YouTube tutorial shows you how to do it for free. |
| Snow | TrackEditor99 | How to make sweet-looking snow, which will be great for those times you want to shoot a scene outside Ironforge in the snow but the in-game snow refuses to fall. |
| Underwater Text | cyrusmir | Shows you how to make your text ripple and distort like you're looking at it underwater. |
| Water Ripples | TrackEditor99 | This is actually a two-part tutorial, with the second part available here. It shows you how to add ripples to a surface so you could, for example, make it look like you're dropping something into a pool. |
| Photoshop | ||
| Lava Planet | TrackEditor99 | Shows you how to create an image that looks like a planet covered in lava, complete with cool glow. WoW videos won't typically have a lava planet in them, but the techniques can be used for other special effects. |
| Premiere | ||
| Chroma Key Tutorial | EdWorksProductions | Mentioned above, this video shows you how to key out background colors like they do with weathermen standing in front of a green screen. This is an important technique when you want to superimpose characters from the WoW Model Viewer on top of a WoW background. |
| Pixelized mosaic over someone's face | TrackEditor99 | Like in the TV show COPS, this will put a pixelized mosaic effect over someone's face (or whatever you want). |
| Star Wars-like scrolling title | ppprod | Want to have a scrolling block of text like in the opening sequences of the Star Wars movies? This tutorial shows you how. |
After Effects Tips
Here are some instructions for how to get After Effects to do some of the basic things that help make a video come to life."I've captured my model in the Model Viewer doing what I want it to do, but how do I get rid of the solid-colored background that's behind it so that my video's background will show through?"
 Just like how when a weather man stands in front of a green screen and then they "key" out the green and replace it with a weather map, you've got to get
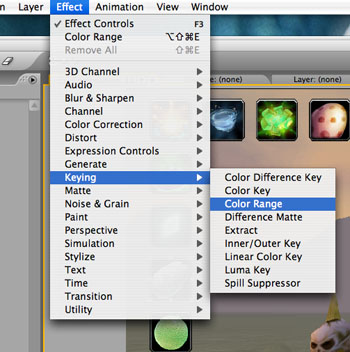
After Effects to do this for you. To do this, once you've imported your clip of your model into After Effects, you need to select the clip and then choose
Effect --> Keying --> Color Range from the menus
Just like how when a weather man stands in front of a green screen and then they "key" out the green and replace it with a weather map, you've got to get
After Effects to do this for you. To do this, once you've imported your clip of your model into After Effects, you need to select the clip and then choose
Effect --> Keying --> Color Range from the menus
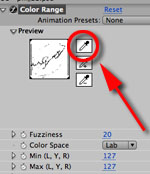 In the top-left panel you'll now see the controls for the Keying effect you're putting on your
clip. Click the top of the three eyedropper icons (your cursor will turn into an eyedropper), and then click on your clip any place where the background
color you want to get rid of is showing. Presto! After Effects will remove all instances of that color from your clip and whatever is behind it will show
through. So now you can put a background behind it that you've captured from the WoW game itself or from the WoW Map Viewer, or a photo, or whatever you want, and
it will look like your character is standing in front of the background naturally.
In the top-left panel you'll now see the controls for the Keying effect you're putting on your
clip. Click the top of the three eyedropper icons (your cursor will turn into an eyedropper), and then click on your clip any place where the background
color you want to get rid of is showing. Presto! After Effects will remove all instances of that color from your clip and whatever is behind it will show
through. So now you can put a background behind it that you've captured from the WoW game itself or from the WoW Map Viewer, or a photo, or whatever you want, and
it will look like your character is standing in front of the background naturally.
You'll want to make sure that the background color you've got set in the Model Viewer is something that only appears in the background and not on the character itself. After Effects will key out all instances of the color you choose, so if your background is black and you key it out, all black will disappear from your clip, which will make shadows and other dark places on your character look transparent. So make your background pink or turquoise or something you know isn't on your model, and then when After Effects removes it, only the background itself is removed.
UPDATE: At some point when I upgraded the programs I use to make videos on my computer, the clips I captured of models in the Model Viewer stopped having crisp edges. The edges where the character met the background, were fuzzy and anti-aliased. This probably made the videos look better, but it screwed me up bad because it made keying out the backgrounds much more difficult. I could key out most of the background, but there would always be a "halo" of color around the character where the colors got more fuzzy.
I tried using the "Color Key" effect instead of the "Color Range" one, and it worked OK sometimes as long as I set the Color Key's Color Tolerance slider very high, and then set the Edge Thin slider to 1 to get rid of the last pesky pixel of unwanted color around the character. But it didn't work well enough to be considered a good solution.
Thankfully, I was able to find an actual full solution to my problem -- in SnapzPro X, I changed the codex it uses to render out the video its just captured to be "Apple Animation". This setting apparently makes it keep everything pixel-perfect and it doesn't anti-alias the colors on the edges of the characters. Problem solved.
To be clear, any of these methods let you use any color you want as the background color. You do not need to set the background to pure blue or pure green, because AE will key out whatever color you tell it to key out. However, if you're using a different program to do the keying, that program may require you to use pure blue or pure green.
"OK, I've got the background color keyed out, but how do I move the clip across the stage?"
When you bring your clip into AE and drag it to the Timeline or the central viewing window, AE creates a new row in the Timeline at the bottom of the screen for the new clip. On each row in the Timeline, towards the left of clip's name, is a right-facing triangle. Click that to display the clip's hidden rows. There will be one named "Transform" (and if you've done the Keying effect on your clip, one for "Effects" too). Click the triangle next to "Transform" to reveal controls for Anchor Point, Position, Scale, Rotation, and Opacity. These are all the things you can easily make change over time for your clip.
To make your clip move across the background, what you'll do is move the Timeline's time indicator to where you want the clip's starting position to be. Then click the little stopwatch icon next to the word "Position" for the clip. You're setting a keyframe here to tell AE that at this point in time, you want the clip's position to be where it is now. You'll see that AE has put a diamond in the timeline to show where you set the keyframe.
Next, move the time indicator to the other end of where you want the movement to finish. So if you're starting out on the left of the screen, but after five seconds you want the character to be over on the right, move the time indicator forward five seconds and change the position of the clip by either dragging the clip to the new position you want, or manually editing the Position values. AE will put another diamond in the timeline to show this second keyframe.
Now, when you play your clip from beginning to end (hit the Home button to move the time indicator to the beginning of your clip, then hit the Space bar to play it), the clip will move from the left to the right of the screen. Instant animation! If your clip is of a character walking, then it will look like they've walked from left to right.

You can do the same thing with the Scale row to set keyframes to make things get bigger or smaller. Or use Rotation to make things spin. You can set any number of keyframes for a clip if you want it to make multiple changes in direction, size, rotation, etc.. Anything you want.
"How do I get a character to look like they're walking through a doorway?"
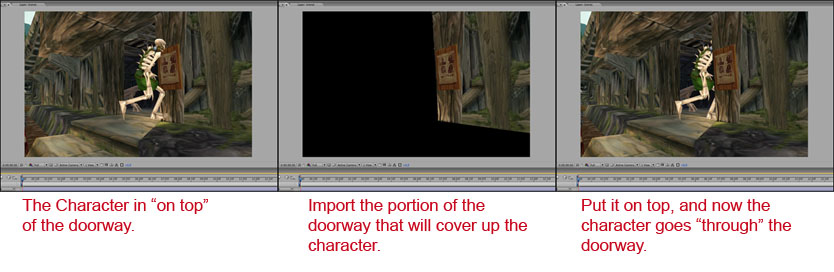
In After Effects, each clip is its own layer, so if you have the background (where the doorway is) on the bottom, with your character on top, the character will look like it's walking up to the doorway and then will walk right past it. Here's how you get him/her to go into the doorway.
The easiest way is to make a copy of your background and then delete or mask out everything except for the part of the doorway that would normally cover up a character going through it. Save this "coverup" version of your background and import it into After Effects. Move the coverup into position (it will look like the coverup isn't there, because it's a copy of what's directly beneath it in your background), and then move its layer on top of the character's layer in the Timeline. Now, when the character gets to the doorway, they'll move behind your coverup and it'll look like they went through the doorway. Movie magic!
This same trick is how you'd get a character to walk behind a tree or bush or have anything be "in front" of your character in the video. Just make sure that the layer for the thing you want to walk behind is above the layer for the character in the Timeline.
Special Effects Without Using After Effects
Here are some techniques for getting After Effects-style animation without using After Effects.Getting a character from the Model Viewer to animate over a WoW background
Tip from Bi0man22: Before talking to Bi0man22, I would have said that you absolutely needed a program like After Effects to get a character from the WoW Model Viewer to animate over a background from the WoW game itself. However, he showed me that's not true -- you can just import a background into the Model Viewer (in the menu, choose View → Load Background), then move your character around until it's in the proper spot doing the animation you want, and then capture the video. Moving the character around on the "stage" will still be tough, and you won't have nearly the same level of control as you would in After Effects, but if you don't have After Effects, this may be good enough.
Examples of how this looks like in a video can be seen in Bi0man22's "Shop Vac" video.
"Faking" Animation
Another tip from Bi0man22: What if you really do need to animate something that you can't get the Model Viewer to do? You can "fake" animation by making a series of still images and then putting them into your video one after the other in quick succession. Animation, after all, is really just a series of still images that go by so fast that our brains interpret them as continuous motion. If you show a series of images quickly enough and with smooth enough transitions between images, your viewer's brains may be fooled.
Unfortunately, full video motion is 30 frames per second, so if you were going to match that with your faked animation, you'd need thirty still images for every second of your video, which is a lot of work. Most of my earlier videos are 15 frames per second and they look OK, but anything less may be noticeable. You'll have to decide how many frames of still images you want to use to make your animation look smooth.
Bi0man22 uses faked animation in his "Shop Vac" video, but he also has a video made completely with this technique for you to check out.
"Green screen" effects in Adobe Premiere instead of Adobe After Effects
I use After Effects to key out background colors and composite the various elements of each shot on top of each other to make a final version. But After Effects is an expensive program, and I'm often asked if you can do that using some other program. It turns out that you can do something similar using the "keying" effects in Adobe Premiere, both Pro and Elements. Since Elements costs $99 compared to $999 for After Effects and $799 for Premiere Pro, this may be a better option for you.
This YouTube video by EdWorksProductions takes you through how to apply the keying effect to your video in Premiere so that you can make a background color disappear.